OpenBVE
Launchpad
Train Driving : Tutorial
All trains work differently but there are some groups of rolling stock that has the same controls.
For trains running on Network West Midlands:
-
Change reverser to Forward F (F key) then back to Normal N (V key). AWS will sound.
-
Cancel AWS/ AWS Reset. (Insert key)
-
Start up the engine (if engine has not started = no humming sound) by pressing/tapping/holding the Pantograph Up/ Engine start button (Key 2). You can only do this when the reverser is set to Neutral.
-
Set head/tail lights (Differs)
-
When done, release brake (Tap the comma ',' or period '.' key to reduce brake from 'EMG' to 'N'
-
Change reverser to Forward.
-
Change notch power (Key Z to increase, Key A to decrease)
-
Go!
For some trains, the brake increase key is 'Q', the decrease key is 'A'.
IMPORTANT
1.AWS Indicator (The most common system in long-distance routes)
Sometimes when passing signals a long beep would sound. This thing may also light up, if your train supports it. This is the Automatic Warning System, the same one when you start your engine. Press AWS Reset button (Insert) to cancel the alarm. THIS MUST BE DONE WITHIN 3 SECONDS OR YOUR TRAIN WILL APPLY EMEGERNCY BRAKES!
The AWS equipment visible in the cab consists of two components, the AWS 'sunflower' instrument, and the AWS Reset button (in ths case, the rounded polished metal button).
When you encounter a green signal, on passing the AWS magnet the in-cab AWS equipment will sound a bell or generate a digital 'bing' sound, depending on the type of train. The AWS 'sunflower' instrument will remain black, or turn black. No action is required by the driver.
When you encounter a signal showing either a red or yellow aspect, on passing the
AWS magnet the in-cab AWS equipment will sound a warning horn. The AWS
'sunflower' instrument will display yellow and white marks (the 'sunflower') once
you have pressed and released the AWS Reset button.
Note: You must press and release the AWS Reset button within 3 seconds, otherwise an emergency brake application will be made. If an emergency brake application occurs, you won't be able to release the brakes or silence the warning horn until the train has stopped.If your train also has the 'Train Protection and Warning System' fitted (see below for details about TPWS), then an 'AWS Brake Demand' will be made, the TPWS Brake Demand indicator will flash red, and the train will be braked to a halt. You will then have to wait for a 60 second timeout before you can cancel the Brake Demand with the AWS Reset button, and release the brakes.
2.ATS: Another system that can ruin your driving. Turn off this system by pressing CTRL+S. Note: This system may not be available for all trains.
ATS-SN (automatic train stop - SN) is a Japanese safety system intended to prevent the train from passing a red signal by applying the emergency brake if the driver does not acknowledge alarms in time.About 600 meters from a signal, an S-type transponder (white box) is placed that raises an alarm in the cab if the associated signal is red. This alarm has to be acknowledged within 5 seconds, or otherwise, an emergency brake application will be performed. In order to acknowledge the alarm, you need to cut off power and apply at least brake notch B1 (or SRV with automatic air brakes), then press the SECURITY_S (space) key. The alarm will now go off and is replaced with a chime. This chime is intended to remind you that the upcoming signal is red and should not be canceled until you know otherwise. In order to cancel the chime, press the SECURITY_A1 (insert) key.
About 20 meters from a signal, an SN-type transponder (green box) is sometimes placed. If the associated signal is red, the SN-type transponder directly forces an emergency brake application.After stop points, an accidental departure transponder (red box) is sometimes placed. If the associated signal is red, this transponder directly forces an emergency brake application. This transponder also triggers if ATS-P is used.
Once an emergency brake application is performed, you have to reset the safety system by turning it off first, then turning it on again. Turning the system on or off is performed by pressing the SECURITY_POWER (CTRL+S) key.
Trains equipped with ATS-SN include these indicators in the bottom-right corner of the screen:
ATS:This is lit orange when ATS-SN is currently active (turned on).
ATS RUN:This is lit red when you have to acknowledge an alarm within 5 seconds, or flashes red when an emergency brake application is performed.
3.TPWS: British version of safety systems.
The TPWS equipment visible in the cab consists of a control panel with illuminated buttons and/or indicator lights:
The red button is the TPWS Brake Demand indicator. This flashes red when an OSS or TSS Brake Demand is made, but can be made to glow solid red by pressing the AWS Reset button after a TPWS Brake Demand is made.
The middle yellow button/indicator is the TPWS Temporary Isolation/Fault indicator. If the TPWS is isolated or has a fault, this will illuminate yellow.
The square yellow button is the TPWS Train Stop Override button/indicator. When this is activated, the light illuminates, and the safety system is temporarily overriden to allow one TPWS equipped signal at danger to be passed without a brake demand being made, or until 20 seconds have elapsed after which TPWS returns to normal operation. You may need to activate the Train Stop Override if you received authorisation to pass a signal at danger, perhaps because of a signalling fault. This should only be done with authorisation from a signaller.
How you can be affected by TPWS:
It is the Brake Demand Indicator. Along the route you will find something like this:
This is a 'speed trap'. If you go along this detector too fast (above speed limit) the Brake Demand will illuminate and the train will apply brakes. You cannot release the brakes and it will ONLY DEACTIVATE 60 SECONDS AFTER THE TRAIN HAS STOPPED. Turning off the train may not help.
Summary:
Under normal circumstances, you should never see any TPWS indicators illuminated, apart from during the startup/self-test procedure. If however you approach a red signal too fast, you will trigger an OSS Brake Demand; if you pass a signal at danger (commit a SPAD) then a TSS Brake Demand will be triggered, and if you fail to acknowledge an AWS warning with the AWS Reset button in time, an AWS Brake Demand will be triggered. When a Brake Demand is triggered, the TPWS Brake Demand indicator will flash red, emergency brakes will be applied, and the train will stop. You can't cancel the Brake Demand or release the brakes until a 60 second timeout has occured, after which the TPWS Brake Demand indicator extinguishes, and you can proceed. Normally you would proceed again only after receiving authorisation from a signaller.
How to stop in time.
1.Reading Signals
Obviously, green means pass, yellow means prepare to stop, red is stop. Any driver can tell you that. But in train driving, usually, there are two yellow lights before a red. The signal changes as the train ahead of you passes. This allows ample space for braking and driving should the train ahead stops (at a station)
There are four signalling blocks. If the train ahead moves out of the red block, the red signal will go one yellow, the one yellow will become two yellows, and so on.
Thus, to stop in time, start to slow down when you pass one yellow signal. But do not rapidly slow down, this will affect your schedule.
2.Seeing the platform
Once you see the platform, apply brakes. Apply the gauge depending on what speed you are on.
I know you can't measure in OpenBVE, but you can estimate. A higher speed (70mph) requires a higher brake notch to stop. However, you can jump among notches, to ensure you stop at the exact position. Where? Scroll down...
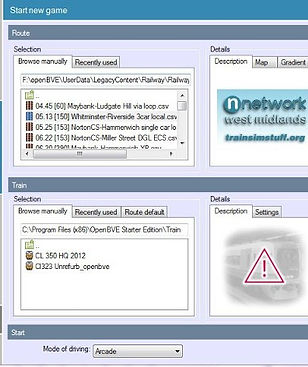
3.#-Car stop
Check your route before launching the game, to see how
many cars of train the route is supposed to handle. This can
be seen in the starting menu. Some Network West Midlands
routes should have it.
Notice the highlighted route has '3car' in its name. This means that
the route handles 3 cars of train. Otherwise, look at the
recommended/default train that can be used. Is it a 3-car train
when you launch the game?
Having this in mind, you should know where to stop. On the route's
stations, there wil be these signs:
For 3, 3-car trains should stop at the 3-car point.
For 6, 6-car trains should stop at the 6-car point.
And so on.
For S, however, any number of car trains should stop at the S-car point. This means that 3 or 6 car trains must stop at the S-car point too.
GOOD LUCK!
For more detailed instructions (Especially for Network West Midlands route) visit http://www.railsimroutes.co.uk/driversguide/index.php
Images obtained from railsimroutes.co.uk
SIMPLER CONTROLS:
This guide covers ONLY:
Accelerating
Braking
Door Open/Close
If you just started up OpenBVE without changing settings, or your rolling stock isn't complex, after route and train have loaded:
-
Press the 'F' key. This will change the reverser(motor) to forward mode(i.e drive forward.) If your rolling stock has a virtual panel like this:
A virtual panel- usually with the blue/yellow/not highlighted bars labelled
'F,B1,ATS,ATS RUN,ATC,etc.'
The indicator at the bottom left side of the window should turn blue with F.
-
Press the 'A' key repeatedly(if neccessary) The indicator beside the reverser indicator should turn pale(no colour) labelled N. This indicates that the brakes are deactivated.
-
Press the 'Z' key once (P1), twice (P2), or more.This starts up the engine. P1, P2 and P3 are basically power gears. P1 will accelerate gradually,while the highest power your train can manage (e.g P7) will accelerate rapidly. The indicator beside the reverser indicator should be labelled P(x), where x is the power level you are on.
-
Press the 'A' key repeatedly until the indicator beside the reverser indicator reaches 'N', and press the 'Q' key once (B1), twice (B2) or more.This deactivates the motor and activates the brakes. The indicator beside the reverser indicator should turn yellow and labelled 'Bx', where x is the braking power you are applying. B1 will cause slight deceleration, while the highest braking point your train can manage (i.e B7) will cause a rapid deceleration. To deactivate brakes, press key 'A' or 'Z' repeatedly.
-
Press key 'F5'(left doors) and/or 'F6'(right doors)to open/close doors.Two indicators should ease up at the bottom centre of the window, labelled 'L' and 'R' (left and right) when doors are opening. When both doors are fully open, both indicators will be highlighted green. When both doors are closing, both indicators will be highlighted yellow, then ease down when it is complete.